| Kabalsrealm.com!! Who'dda thunk it!! |
|
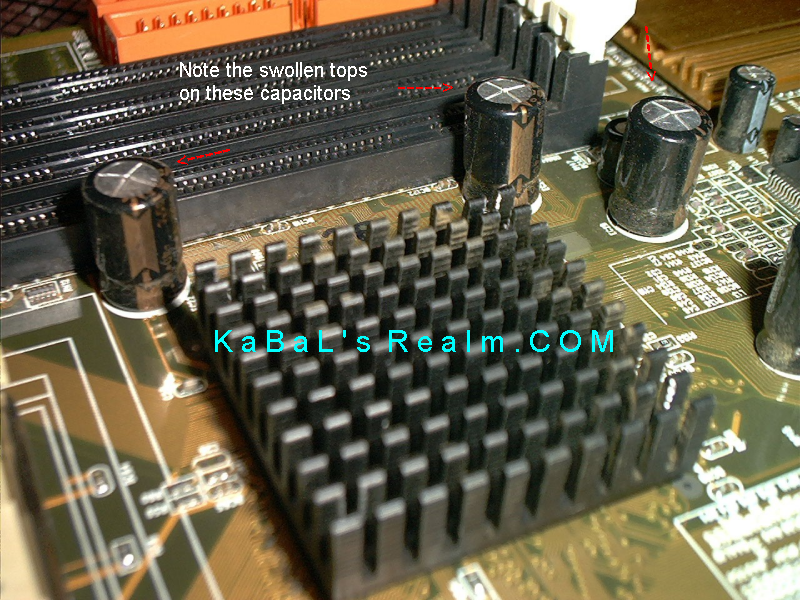
First of all, had this been a $20 throw-away motherboard, I wouldn't have even considered this endeavor. A VP6 on the other hand, is FAR from a $20.00 throw-away!! Abit stopped making these quite some time back, and finding a vendor that still sells new ones is few and far between!! The last time I saw a vendor selling new ones they were getting a premium of $180.00 for them, and even a working used VP6 on Ebay will bring $150.00 or more! The VP6 is rapidly becoming an endangered species, so I figured this was well worth this effort!! If you don't think you could successfully do this procedure, login to the forums at Badcaps.net. This isn't too terribly difficult... More effort and skills are required to modify those aluminum cases with corny neon lights, colored fans, and unnecessary water cooling than it is to do this... This problem is caused by a number of faulty electrolytic capacitors located in the VRM (Voltage Regulator Modules), memory, and AGP sections of your VP6 motherboard. This problem affects primarily the 1500uF 6.3v and the 1000uF 16v capacitors, for a total of 19 caps being replaced. The quality of these caps is obviously very poor, as they are failing at an extremely young age!! This problem occurred on one of my VP6's just a month before its second birthday. The other one lived just over 2 years and came down with this 'illness'. The symptoms are frequent and random freezing and/or blue screens of death. Depending on which section is failing, it is entirely possible that your VP6 will not POST (Power On Self Test) if the VRM caps are extremely faulty. If the failure is in the memory section of your board, you might get a memory test failure or crashes within windows that indicate a memory failure. The physical signs of this failure are the tops of the capacitors swelling up or have a brownish ooze coming from the tops or out from underneath them. I personally frown upon Abit for using such low-quality components on their products. You might remember that Abit's BP6 motherboard had this problem also. That's here nor there, as the problem exists, and here's a solution for it. As time goes by, I see more and more VP6's showing up with this problem. The first time it happened to me I just figured that particular motherboard was a flaky a turd, and threw it on the junk shelf... This board got to the point it wouldn't even POST. When the second one went POOF with the similar symptoms, I knew there was more to this. I got both down off the junk shelf and examined them looking for the common denominator... I experimented with this procedure on the first VP6 that died since it didn't POST anymore... I figured it would be the more challenging one... It looked a bit 'rough around the edges' upon completion, but it turned out to work flawlessly. The second one actually looked professional and has been working without a hiccup since this procedure was completed on August 12, 2002. Before I completed this, neither one of these boards would run for over an hour without crashing in some way.
System faults
Physical faults
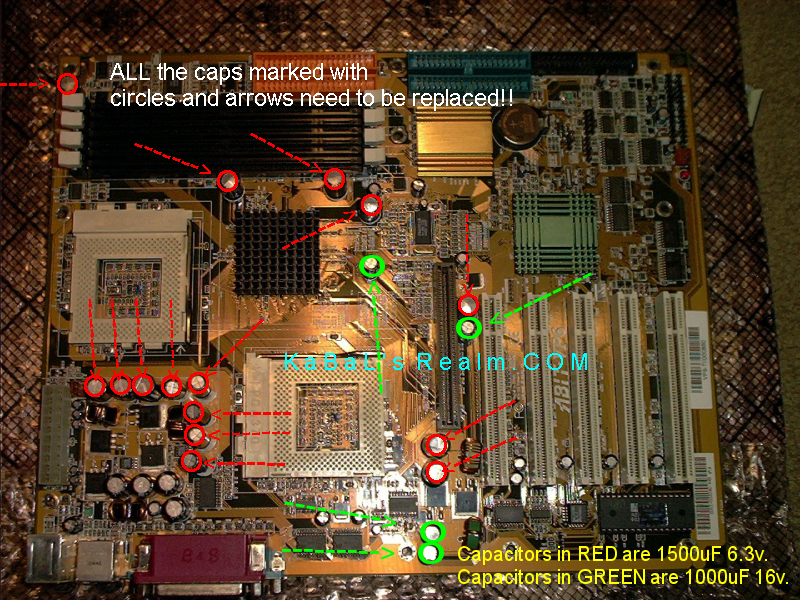
**NOTE** If you aren't experiencing any stability issues or having any problems with your VP6, you do not need to do any of this!!! You will now need to determine the location and how many capacitors you need to replace. You will need to have your motherboard completely removed from the case and disconnected, and good lighting. Lay it down on an anti-static bag!!! I recommend replacing ALL of the capacitors marked in the photo below, because even if they aren't showing physical signs of failure, they are more than likely faulty. I removed ALL the caps noted in the pictures, even the ones that weren't showing physical signs of failure. I then tested each one with a Sencore LC102 capacitor analyzer, and EVERY SINGLE ONE was so far out of spec that it was totally unusable!! I know this entire procedure seems like an impossible chore, but it really isn't. It took me about two hours per board to complete on my first few boards. After some experience, I have this down to a science, and can completely recap a VP6 in less than 30 minutes per board... That's when you know you've done this too many times!! Below is a complete list of all 19 capacitors and their locations. Also, see the photo. 1500uF Capacitors: 1000uF Capacitors:
The commonly failed capacitors are located near the ATX power connector surrounding the VRM transistors. There are 8 of these total associated with the VRM. Look at the tops of the caps and see if there is any swelling or bulging, and/or any brown ooze coming from their tops. Also look around their bases for ooze or signs of swelling. If they are crooked or not sitting flush and straight on the PCB (Printed Circuit Board), they more than likely have failed. Do the same for the capacitors in the vicinity of your DIMM memory slots. There are 4 capacitors associated with the memory slots. There are also 3 located by the AGP. One is between the AGP and PCI slot 1, and the other two are toward the front and above the AGP slot.
Capacitors: *The capacitors are available from Badcaps.net (Your best bet!!) has a 23-piece kit for the VP6 for only $22.00. Order one HERE. Soldering
Equipment & Tools:
**NOTE**
DO NOT CANNIBALIZE THE CAPACITORS FROM AN OLD MOTHERBOARD THAT YOU HAVE
SITTING IN YOUR JUNK PILE SOMEWHERE!!
BE
WARNED THAT THIS PROCEDURE REQUIRES SOME PRECISION SOLDERING SKILLS!!!
If your board is still covered under factory warranty, obtain an RMA (Return
Material Authorization)
from Abit and send it back for a replacement!! If you have had limited or no soldering/electronics
training or experience, you might not want to
attempt this!! ESD (Electro
Static Discharge)
is one of the biggest killers of motherboards and other computer
components. A wrong move or a slip with the soldering iron could
be fatal for your motherboard!! Having said that, keep this in
mind... Motherboards and peripherals are much tougher than given
credit for... Using general ESD precautions, common sense, and
touch of finesse,
you shouldn't have any problems. To date I have performed this
on over 30 VP6 boards, and had only 2 not survive. Although, the 2 dead
board had problems beyond bad capacitors. Just be warned there is a very
slight chance yours might
not survive this either!! This is the 'last hope' of saving your out of
warranty VP6
before you either pitch it in the trash or sell it on eBay for spare parts, so what do you really have to lose?!? However, if you
can't wire a lamp without shocking yourself, I don't recommend trying
this!!
|
Kabal's Realm
Last Updated:
Tuesday May 08, 2018
Established December, 1997
Copyright© 1997-2018, Kabalsrealm.com